Artifacts Of The Ancients
## Artifacts Of The Ancients
This plugin adds several artifacts that, when obtained, grant players various abilities. These artifacts have unique methods of acquisition.
This comprehensive plugin includes three powerful artifacts, each of which bestows incredible abilities upon players:
##
### Time Artifact
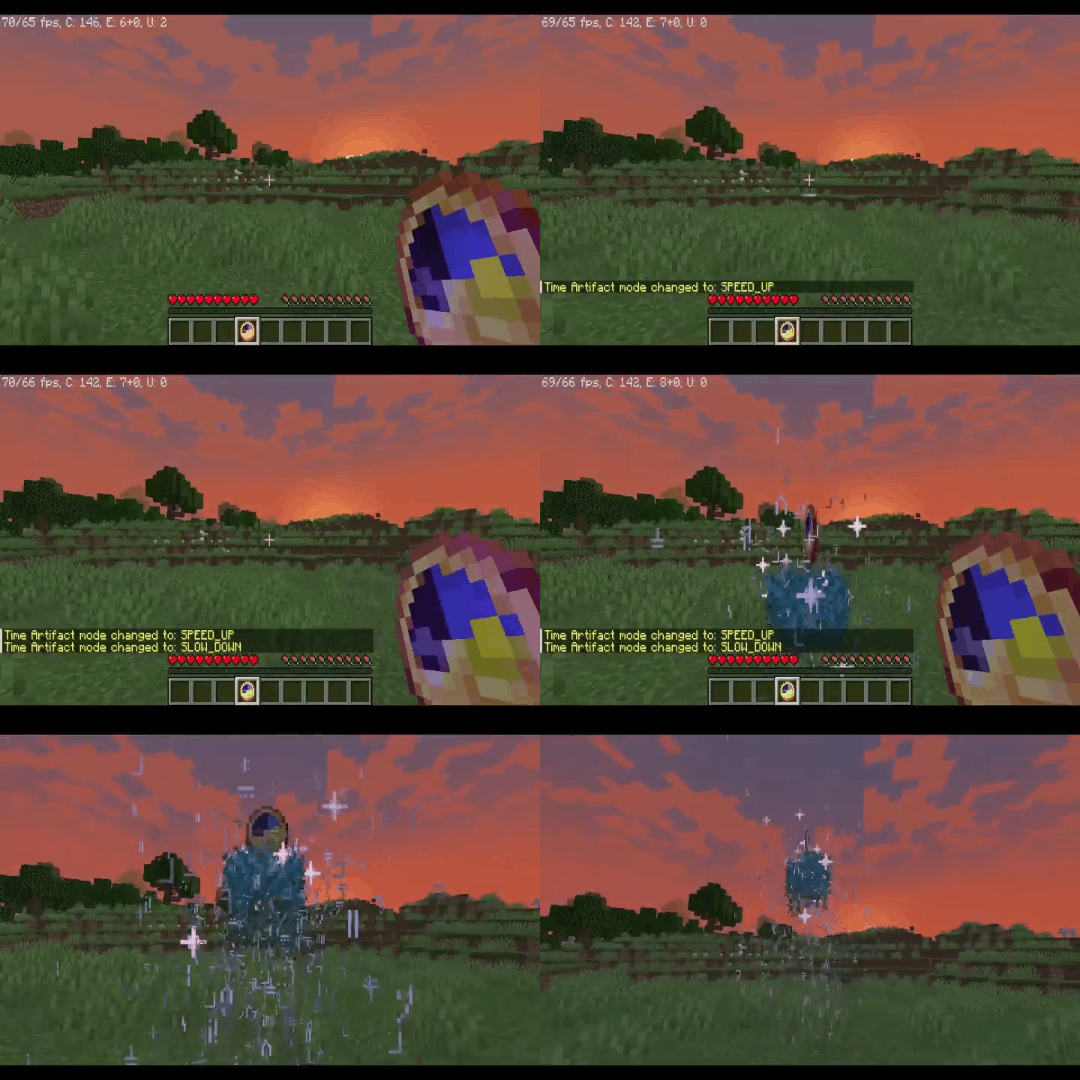
Allows the player to slow down, speed up, or even completely stop the flow of time for a certain period.
>
>
Obtaining
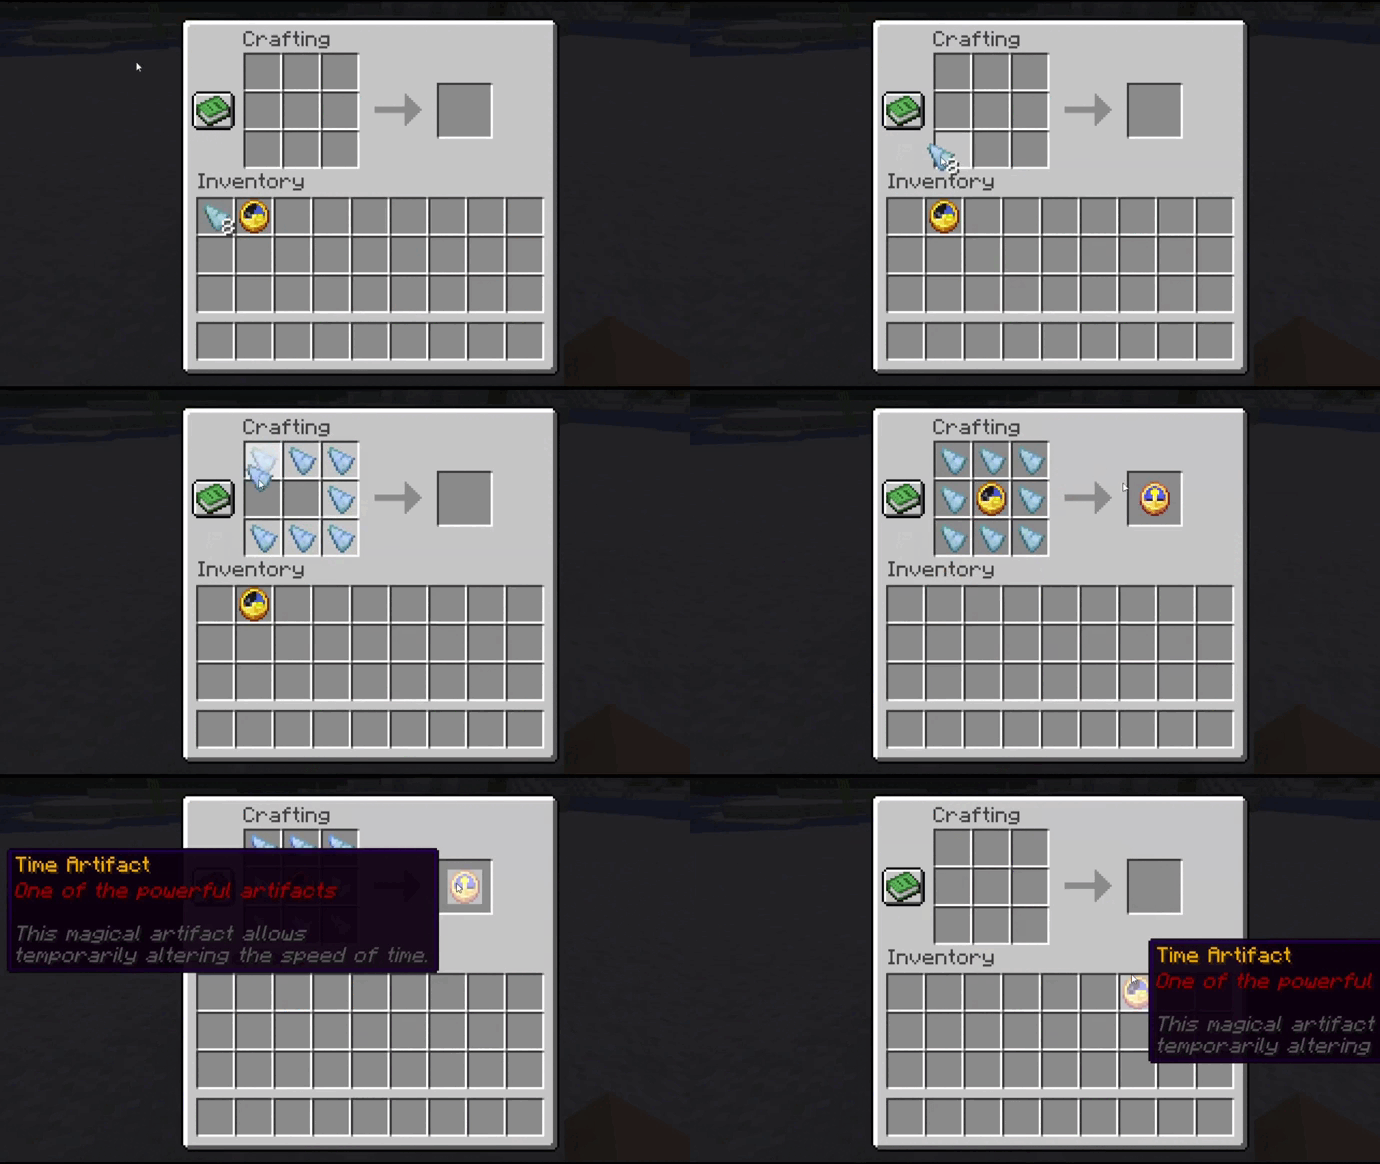
To craft the Time Artifact, you will need a regular clock, which must be placed on a crafting table and surrounded by “Temporal Paradox Shards”.
>
>
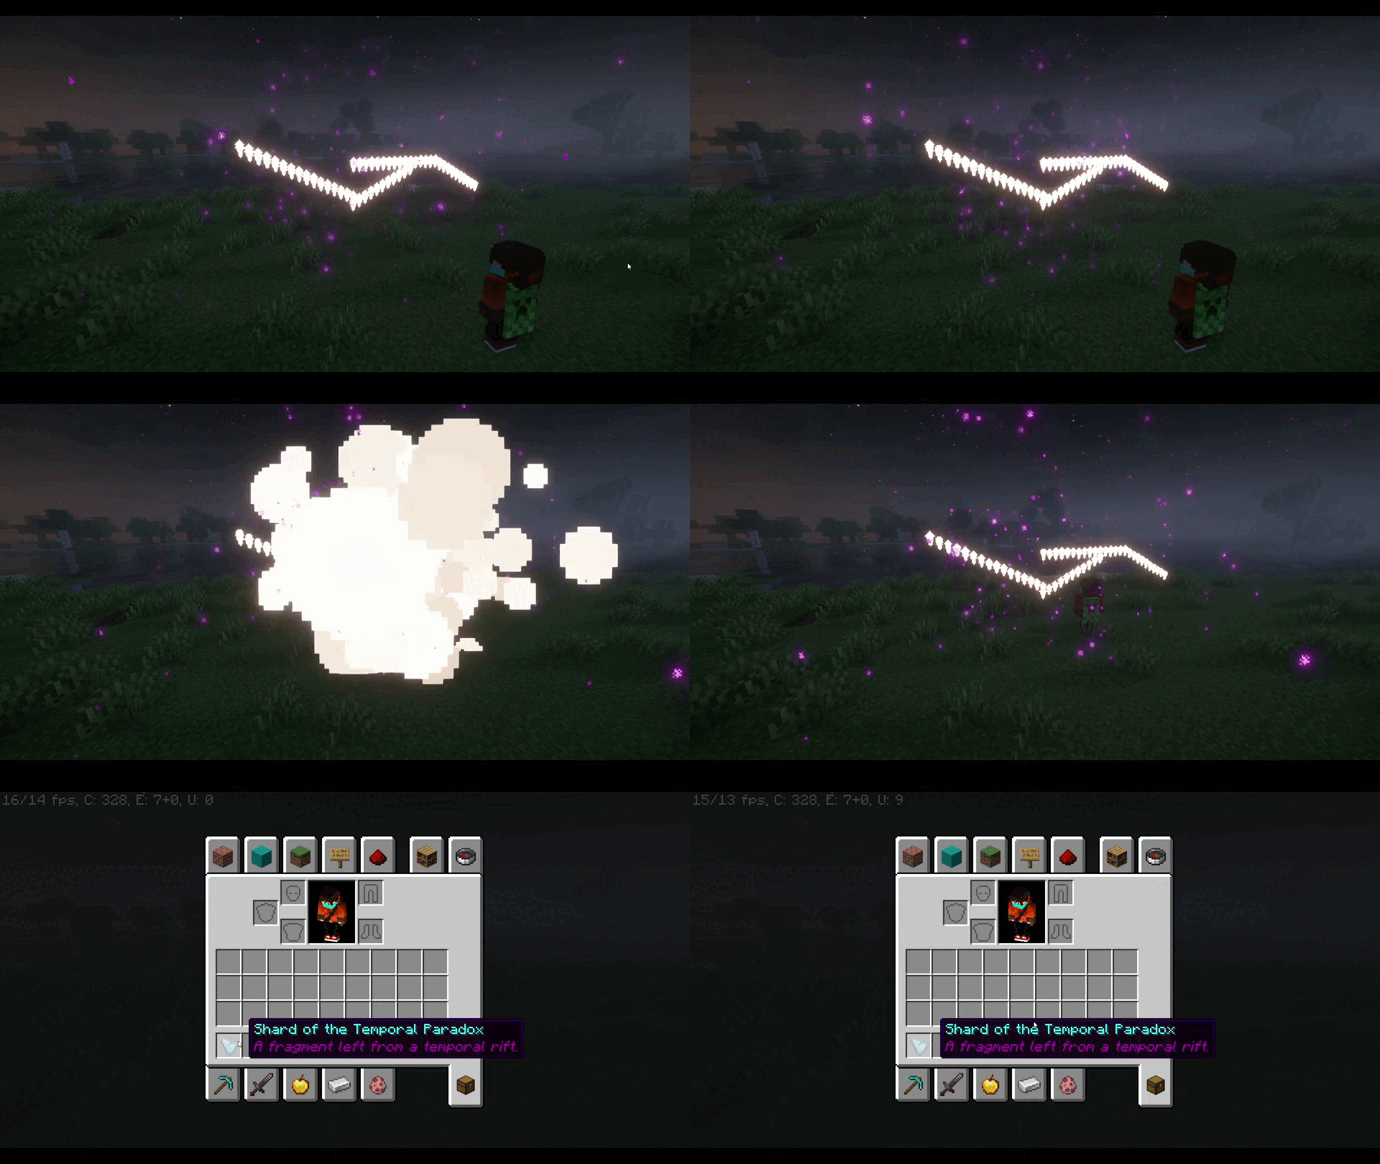
This rare shard can be obtained by passing through a temporal rift, which sporadically appears in the world.
>
##
### Seer’s Compass
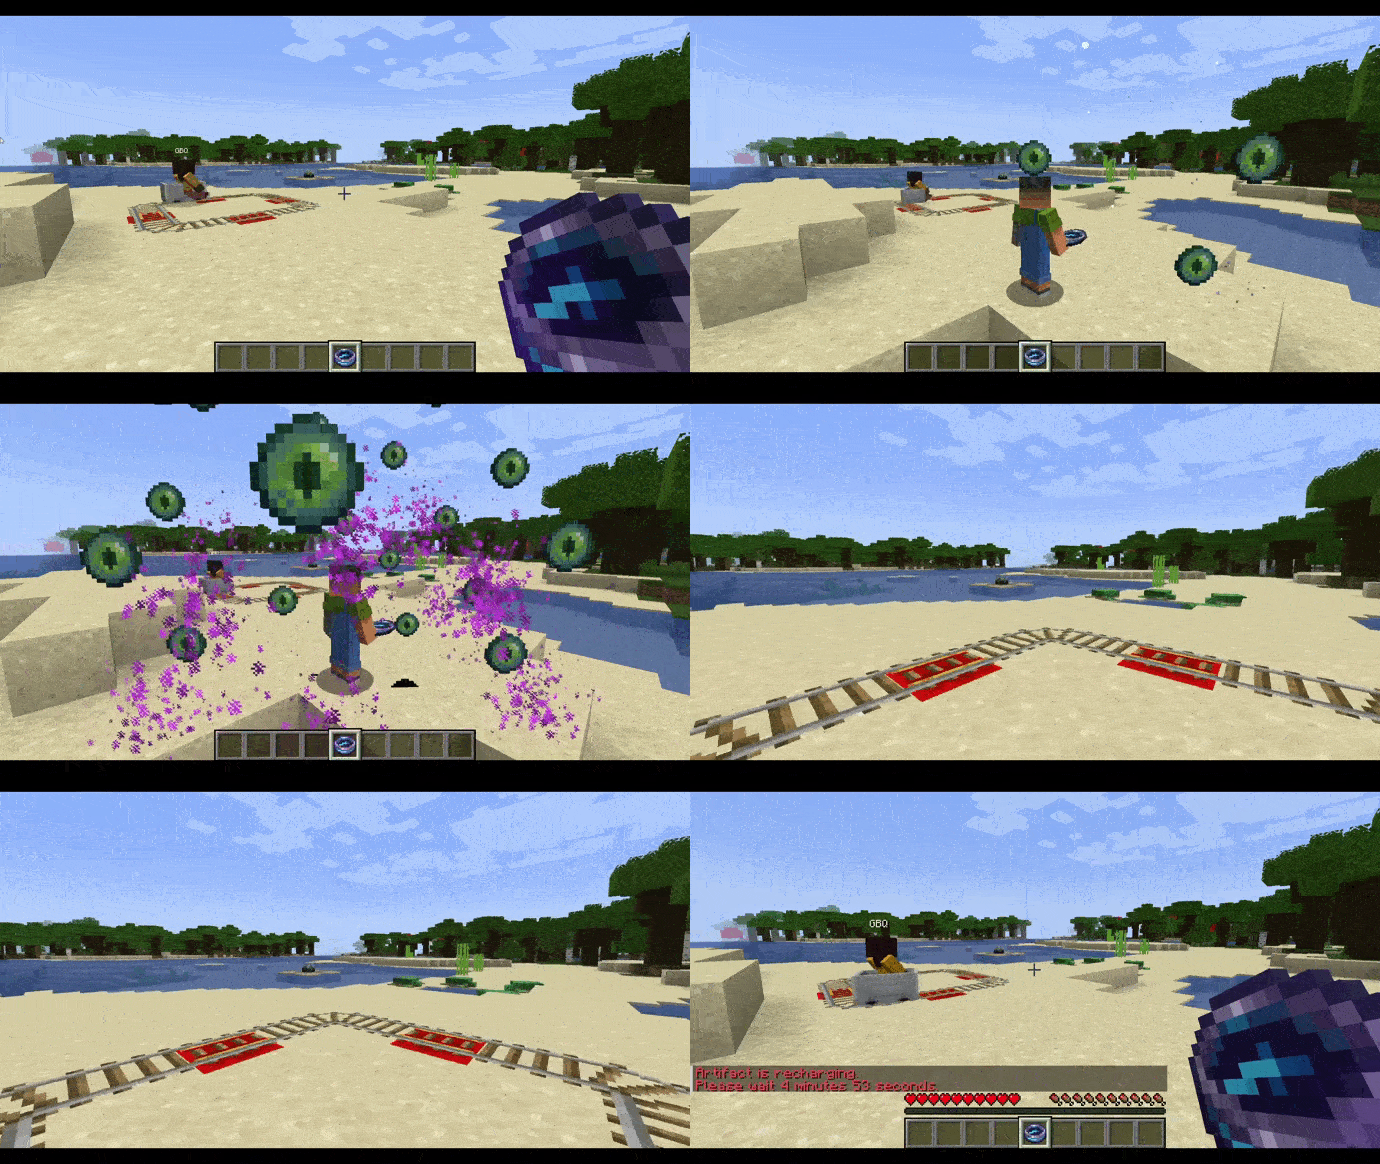
Grants the player the ability to see the world through the eyes of other players, allowing them to track their movements and actions.
>
Obtaining
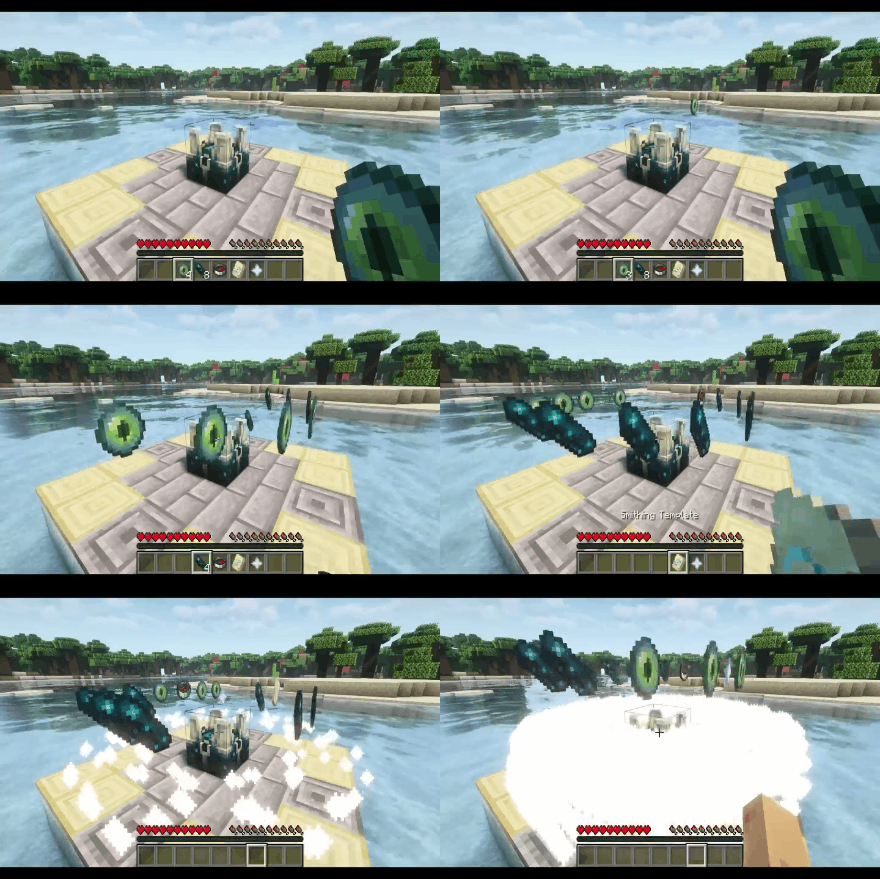
To create the Seer’s Compass, you will need to place the following ingredients on a special block called the “Scalkowing Crier”: 8 echo shards, 4 ender eyes, 1 compass, 1 nether star, and 1 “Eye” armor trim. This will initiate the artifact creation process, resulting in the Seer’s Compass.
>
>
##
### Guardian Amulet
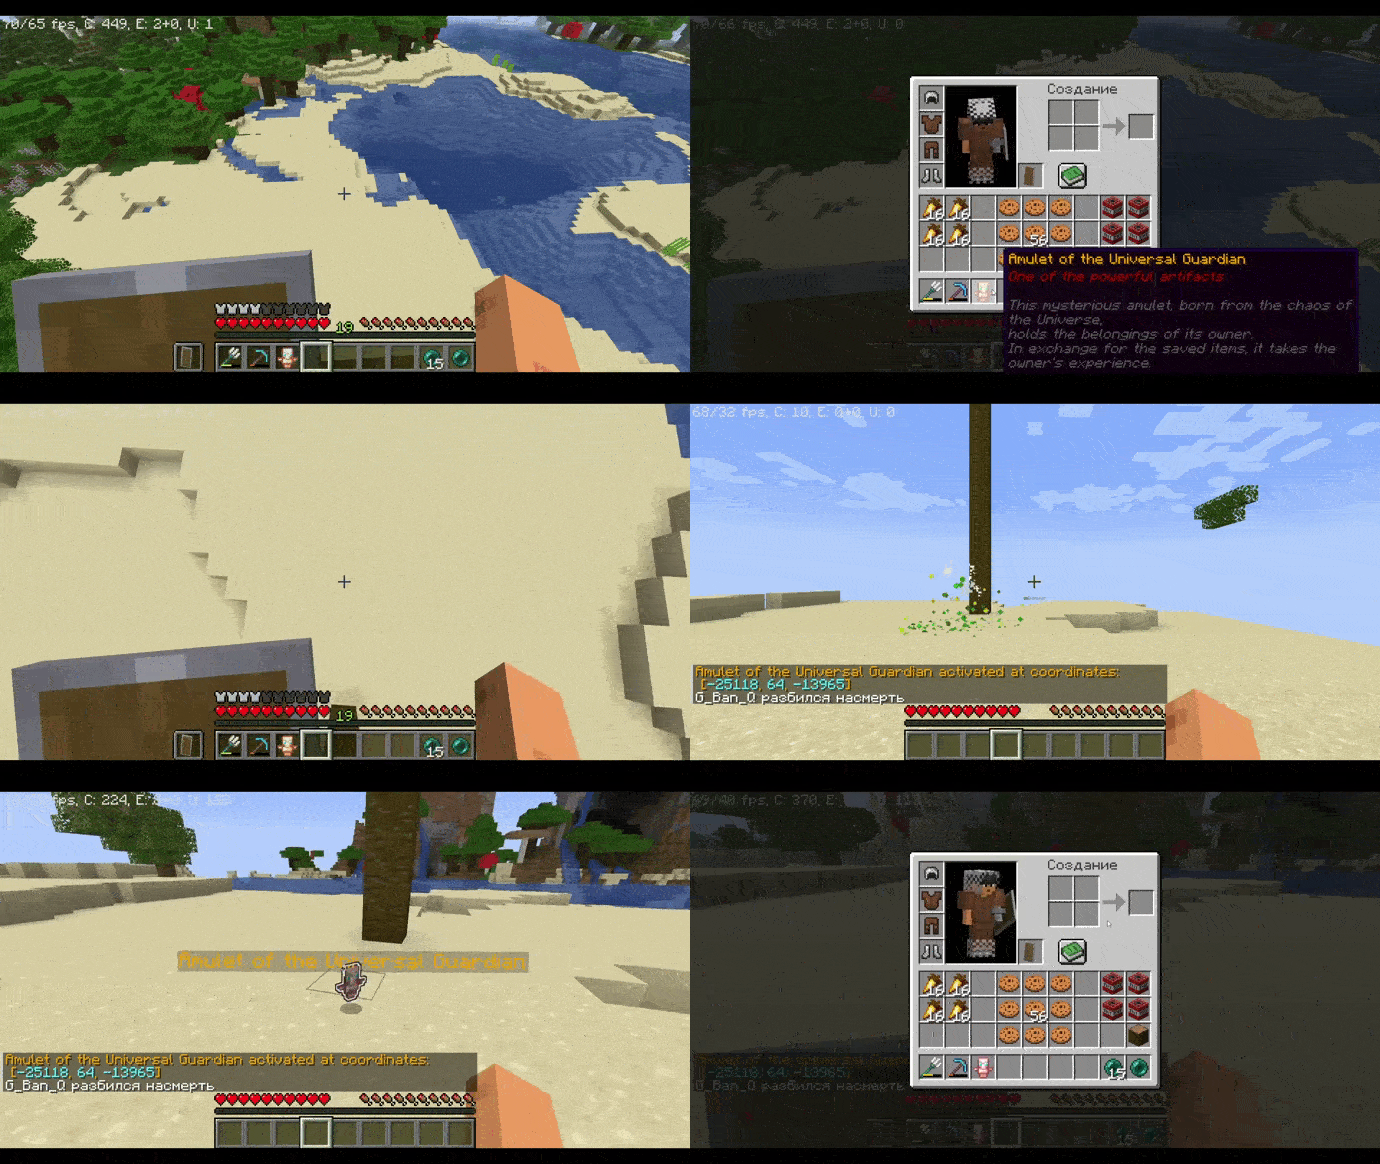
When the player dies, the amulet will save all of their items, holding them until the owner retrieves the artifact. Upon retrieving the amulet, the player’s items will be returned to them, but their experience will be taken. The amulet also displays the coordinates of the player’s death.
> 
>
Obtaining
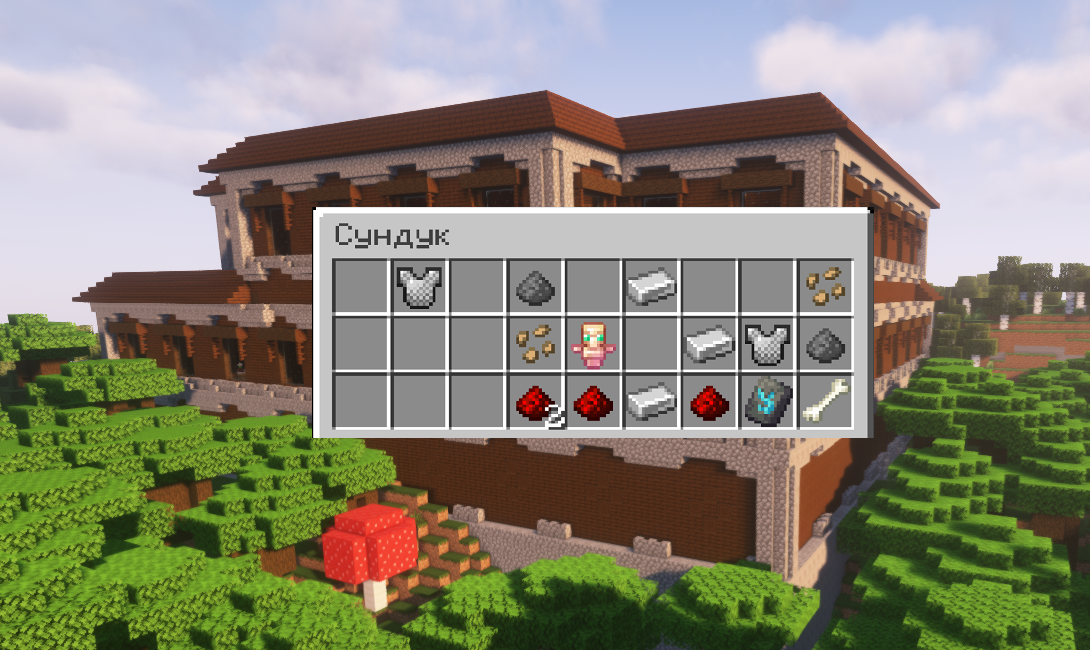
This amulet can be found in chests located in woodland mansions with a 30% probability.
> 
>
## Plugin Commands:
| Command | Permission | Description |
| — | — | — |
| /artefactinfo | AotA.usage | Obtain information about the artifacts |
| /magiccompass | AotA.usage | Grant the Seer’s Compass to the specified player |
| /giveguardianamulet | AotA.usage | Grant the Guardian Amulet to the specified player |
| /timeartifact | AotA.usage | Grant the Time Artifact to the specified player |
| /givetimeshard | AotA.usage | Grant a Temporal Paradox Shard to the specified player |
| /spawnrift | AotA.usage | Summon a temporal rift |
## Permissions:
– AotA.usage – Allows the use of all commands from the “Artifacts of the Ancients” plugin.
##
> **This plugin is currently in development and will be updated, so expect new items and features in the near future!**
> _The open-source code of the plugin will be available in its final versions._
>
Articulate
# Articulate
A Minecraft plugin to manage your player.
Supported Versions
**Spigot & Paper Supported**
– 1.21.5
– 1.21.6
– 1.21.7
– 1.21.8
– 1.21.9
– 1.21.10
## About
Articulate is made to simplify making changes to your player. Whether its attributes, god mode, or anything else, Articulate makes it easy!
## Features
* Flight
* Fly speed
* Walk speed
* Max health
* God mode
* Instakill
ArthCore
ArthCore is a plugin that provides 4 features:
> •Stops server at a configurable time every day and sends a warning message beforehand at a configurable time
>
> •/transfer (playername/@p) (port) (IP address) transfers bedrock players to an IP and port using the floodgate API
>
> •/sell command that works just like in EssentialsX, works with Vault & any economy plugin
>
> •/hub command sends you back to world “world”. This feature is incomplete and will be overriden by your proxy if you have one.
**Dependencies:**
Vault (needed for /sell)
An economy plugin (needed for /sell)
Floodgate & Geyser (needed for /transfer)
**Credit:**
Creator (Arionas03)
Maintainer and Owner (DiamonC)
Arte
> **NOTE: Arte works only on Minecraft 1.20.3+**
Table of Contents
-
About Arte
-
Getting Started
- Usage
- Contact
## About Arte
So, what does it do? Simple! Let’s say you have a BIG server resource pack.
Every time you make a little change, you will have to manually re-host it somewhere, and players will have to fully re-download it.
This can get annoying. Arte splits the resource pack into parts (by namespaces), hosts it directly on your server
and sends each one as a different server resource pack!
> Q: How is this possible? There can only be one server resource pack loaded at one time!
> A: In 1.20.3 Mojang added a new feature that allows servers to send multiple server resource packs at a time!
Players will only re-download the parts that actually need updating, and apply other server packs.
## Getting Started
To set up Arte on your server follow these steps.
### Prerequisites
Different mod-loader require different dependencies!
#### On Fabric:
[![Requires Fabric API][fabric-api-shield]][fabric-api-url]
#### On Spigot:
* Requires nothing!
#### On Paper:
* Requires [ProtocolLib][protocol-url].
### Installation
[![Hangar][hangar-shield]][hangar-url]
[![GitHub][github-shield]][github-url]
[![Polymart][polymart-shield]][polymart-url]
[![Spigot][spigot-shield]][spigot-url]
_Download and install the mod or plugin from [Modrinth][modrinth-versions-url], [Hangar][hangar-versions-url], [Polymart][polymart-updates-url], [Spigot][spigot-updates-url] or [GitHub Releases][github-releases-url]._
1. Start your server
2. Open Arte’s config file
3. Set `address` to your server’s public address
4. Open the port specified in config (`1864`) or put already opened port in the `port` field in config.
5. Restart your server
## Usage
Put your resource pack source (not zipped) in the `arte/resourcepack/` folder and run `/arte reload`.
> Note: Arte folder can be different depending on your server! If you use Fabric or Quilt, it’s folder will be in server’s folder.
> If you use Spigot, then Arte’s folder will be located in `plugins/arte/`.
_For more examples, please refer to the [Documentation](https://projects.shardmc.su/arte)._
## Contact
[![Discord][discord-shield]][discord-url]
[spigot-shield]: https://raw.githubusercontent.com/intergrav/devins-badges/v3/assets/cozy/supported/spigot_64h.png
[fabric-shield]: https://raw.githubusercontent.com/intergrav/devins-badges/v3/assets/cozy/supported/fabric_64h.png
[noforge-shield]: https://raw.githubusercontent.com/intergrav/devins-badges/v3/assets/cozy/unsupported/forge_64h.png
[rptweaks-url]: https://modrinth.com/mod/resource-pack-tweaks
[fabric-api-shield]: https://raw.githubusercontent.com/intergrav/devins-badges/v3/assets/cozy/requires/fabric-api_64h.png
[fabric-api-url]: https://modrinth.com/mod/fabric-api
[protocol-url]: https://ci.dmulloy2.net/job/ProtocolLib//lastBuild/
[spigot-url]: https://www.spigotmc.org/resources/arte.114150/
[github-shield]: https://raw.githubusercontent.com/intergrav/devins-badges/v3/assets/cozy/available/github_64h.png
[github-url]: https://github.com/ShardMC/arte
[hangar-shield]: https://raw.githubusercontent.com/intergrav/devins-badges/v3/assets/cozy/available/hangar_64h.png
[hangar-url]: https://hangar.papermc.io/shardmc/arte
[polymart-shield]: https://raw.githubusercontent.com/intergrav/devins-badges/v3/assets/cozy/available/polymart_64h.png
[polymart-url]: https://polymart.org/resource/plugin-arte.5242
[curseforge-shield]: https://raw.githubusercontent.com/intergrav/devins-badges/v3/assets/cozy/available/curseforge_64h.png
[curseforge-url]: https://curseforge.com/minecraft/bukkit-plugins/arte-for-spigot
[spigot-shield]: https://raw.githubusercontent.com/intergrav/devins-badges/v3/assets/cozy/supported/spigot_64h.png
[spigot-url]: https://www.spigotmc.org/resources/arte.114150/
[modrinth-versions-url]: https://modrinth.com/plugin/arte/versions
[hangar-versions-url]: https://hangar.papermc.io/shardmc/arte/versions
[polymart-updates-url]: https://polymart.org/resource/arte.5242/updates
[curseforge-updates-url]: https://curseforge.com/minecraft/bukkit-plugins/arte-for-spigot/files
[spigot-updates-url]: https://www.spigotmc.org/resources/arte.114150/updates
[github-releases-url]: https://github.com/ShardMC/arte/releases
[github-issues-url]: https://github.com/ShardMC/arte/issues
[discord-shield]: https://raw.githubusercontent.com/intergrav/devins-badges/v3/assets/cozy/social/discord-plural_64h.png
[discord-url]: https://discord.gg/CqVAzakrqx
ArtChanger
Paper plugin mapping internet images into item frames with auto aspect-based grids, high-quality dithering+sharpen, persistence across restarts, anti-dup drops, multi-source URLs, rotation, EN/RU locales, safe and fast by bdiev_.
# Key Features:
– Load images from URLs (Instagram, Discord CDN, Telegram, Imgur, ImgBB, any direct link)
– Auto grid sizing by aspect ratio (e.g., 1:1 → 3×3, 16:9 → 4×2, 4:3 → 4×3; manual 3×2 / 5×5 also supported)
– Rectangular grids with placement validation and chunk-load restoration (tile metadata stored)
– High-quality pipeline: multi-step downscale, sharpening, Floyd–Steinberg dithering, palette mapping to Minecraft maps
– Rotate with right-click; delete with left-click (clears group, keeps main frame)
– Anti-dup: auto-created frames do not drop; only one frame drops per grid
– Persistence across restarts (image ID + grid metadata stored in frames)
– Asynchronous downloads (non-blocking for the server)
# Commands:
– /artchanger set [size]
– size formats: 3 (square), 3×2 (rectangular). If omitted → auto-sized by aspect ratio.
– /artchanger help — show help
# Usage:
– Shift + Right click to paste item in the frame
– Run /artchanger set [size]
– Right-click an item frame to place the image
– Right-click again to rotate
– Left-click to remove the picture (main frame stays; grid auto-frames are removed without drops)
# Grid Sizing:
– Auto: aspect-ratio based (1:1→3×3, 16:9→4×2, 4:3→4×3, 3:2→3×2, 2:3→2×3, 9:16→2×4, panorama>2.5→5×2)
– Manual: /artchanger set 4×3 or /artchanger set 5
– Max recommended grid: 10×10
Please, text me if you found any bugs, Thanks!
ArrowHitMSG
**ArrowHitMSG – Instant Arrow Hit Feedback**
This lightweight plugin enhances archery combat on your Minecraft server by providing immediate feedback when players hit others with arrows. The plugin delivers a seamless experience for archers by showing critical information right when you need it.
Key Features
Instant Hit Confirmation: Get immediate visual feedback when your arrow finds its target
Damage Display: See exactly how much damage your shot dealt
Remaining Health Display: Know your target’s remaining health after your shot
Customizable Notifications: Choose between chat messages, action bar, or title notifications
Sound Effects: Optional sound confirmation for successful hits
Full Color Customization: Match the plugin’s appearance to your server’s theme
Performance Friendly: Minimal impact on server resources
Simple Configuration: Easy to set up with well-documented config file
Permission-Based: Admin reload command with appropriate permission checks
**
Why Choose This Plugin?**
This archery feedback tool fills an important gap in Minecraft’s combat system. In vanilla gameplay, you often can’t tell if your arrow hit or how effective it was, especially at longer ranges or in chaotic combat situations.
With this plugin, you’ll gain valuable tactical information that can help you improve your archery skills and make better decisions in PvP combat. The customizable notification system lets server owners decide exactly how this information is presented to players.
**Server Benefits**
For server administrators, this plugin enhances PvP gameplay without altering the core mechanics. It’s perfect for:
Combat-focused servers where archery skill matters
Survival servers with PvP elements
Minigame servers featuring bow combat
Any server looking to enhance player feedback during combat
The plugin is designed to be lightweight and efficient, using modern Bukkit/Spigot APIs for optimal performance. It works well alongside other combat enhancement plugins and won’t conflict with most server setups.
**Getting Started**
Simply place the plugin JAR in your plugins folder and restart your server. Default settings will work immediately, but you can customize the experience through the config.yml file to suit your server’s unique style.
The plugin integrates seamlessly with permission systems, allowing server owners to control who can reload the configuration.
Upgrade your server’s archery combat experience today with this essential feedback tool!
Armstrong

**Armstrong** is a simple plugin that utilizes [Lunar Client](https://lunarclient.com)’s [Apollo API](https://github.com/LunarClient/Apollo).
**Found a bug or have a feature idea?** Use the [issue tracker](https://github.com/Vaption/Armstrong/issues)!
[](https://modrinth.com/plugin/armstrong)
[](https://github.com/Vaption/Armstrong/releases/latest)
[](https://github.com/Vaption/Armstrong/blob/main/LICENSE)
## ⚖️ Armstrong vs. LunarUtility
Originally the goal was just to migrate the codebase to use Apollo rather than the old BukkitAPI.
During the migration, I noticed that Apollo (on its own) now does some of what this plugin once did.
So, the waypoints & disabled-mods module have been removed from this plugin (now configurable in Apollo).
The cooldown module implementation was also removed, but will come back to it at a later time!
## 🙌 Credits
Armstrong is based off of [LunarUtility](https://github.com/RefineDevelopment/LunarUtility). All credit to the original developers!
👨💻 **Contributors**
– 🏙️ [Dubai](https://github.com/GamerRealm) – Original Author
– 🛠️ [Komek](https://github.com/Komeek) – Maintainer
– 💡 [kayalust](https://github.com/kayalust) – Contributor
## 📥 Installing
1. Download the jar from [releases](https://github.com/Vaption/Armstrong/releases)
2. Download LunarClient’s Apollo API jar from [here](https://github.com/LunarClient/Apollo/releases)
3. Drop **both** jars into all your servers
4. Edit the configuration files to your liking
## 📜 Terms of Use
– No selling or claiming this project as your own
– Please respect & credit the developers
## ✨ Features
🏷️ Nametag
Enabled by default, configurable in `config.yml`.

🔒 Require Lunar Client
Disabled by default. Enable by setting `REQUIRE-LUNAR` to `true` in `config.yml`.

🛡️ Staff Mods
Requires `armstrong.staff` permission. Toggle with `/lsm `.

🌙 Player on Lunar Client
Requires `armstrong.players` permission. Check if someone is using Lunar Client with `/lc `.

📋 All Players on Lunar Client
Requires `armstrong.players` permission. Get a list of players on Lunar Client with `/lc players` (or `list` / `users`).

Adaptive Range Mob Spawner
# Adaptive Range Mob Spawner (ARMS)
The Adaptive Range Mob Spawner (ARMS) plugin dynamically adjusts the activation range of spawners in Minecraft based on the server’s TPS (Ticks Per Second), ensuring optimal performance while maximizing mob spawn rates. It improves gameplay by maintaining a balance between efficient mob farming and server stability, even during high player activity.
## Key Features
Dynamic Activation Range Adjustment:
Automatically adjusts the spawner’s activation range between a low and high threshold based on the server’s TPS.
When TPS is high, the range increases to maximize mob spawning.
When TPS drops below the configured threshold, the range decreases to reduce server load.
### Player-Defined Range Control:
Initial, low, and high ranges can be defined in the configuration to meet server needs.
Set a custom initial range for placed spawners.
Automatically revert to a vanilla range for naturally generated spawners (optional).
### Intelligent Chunk Management:
Only updates chunks near active players to reduce unnecessary processing.
Preexisting spawners can optionally be treated as player-placed for backward compatibility.
### Auto-Update on Chunk Load:
Ensures spawners update dynamically when a chunk is loaded or when the TPS status changes.
### Persistent Player-Placed Spawner Tagging:
Spawners placed by players are marked with persistent data, ensuring that only marked spawners retain adjusted ranges while natural spawners can be left unaffected.
### Startup and Manual Update Options:
Automatically updates all loaded chunks on server startup.
Force-update all spawners manually with a command.
## Configuration Options
The plugin offers an extensive configuration file to customize its behavior:
### Range Settings:
initial-spawner-range: Initial range for player-placed spawners.
spawner-range-high: Range when TPS is high.
spawner-range-low: Range when TPS is low.
### TPS Thresholds:
tps-threshold-low: TPS level to reduce the range.
tps-threshold-high: TPS level to restore a higher range.
### Chunk Management:
only-update-near-players: Limit updates to chunks near active players.
player-chunk-radius: Radius of chunks around players to monitor.
### World Control:
disabled-worlds: List of worlds where the plugin should be disabled (e.g., the_nether, the_end).
### Spawner Update Policies:
affect-naturally-generated: Whether to update naturally generated spawners.
update-preexisting-spawners: Whether to update preexisting spawners without a player-placed marker.
## Commands
/adaptivespawner — View the current TPS, range, and status of the plugin.
/adaptivespawner reload — Reload the configuration file without restarting the server.
/adaptivespawner debug — Toggle debug mode to enable verbose logging.
/adaptivespawner update — Force a manual update of all loaded spawners.
## Permissions
block4block.admin — Grants access to plugin commands and configuration reloading.
## Use Cases
– Farms and Grinders: Maximize mob spawns while protecting TPS during high server load.
– Survival and Faction Servers: Dynamic range adjustment ensures that high mob spawning does not cause server lag.
– Creative and Custom Worlds: Fine-tune mob spawn mechanics to suit the specific needs of your server.
## Performance Impact and Safety
Optimized for minimal impact using chunk caching and efficient TPS checks.
Asynchronous chunk processing where supported (for Paper servers) ensures smooth updates even during peak hours.
Debug mode for detailed logging and troubleshooting.
## Installation and Setup
Download and place the plugin .jar file in the server’s plugins folder.
Start or reload the server.
Customize the config.yml to fit your server’s requirements.
Use /adaptivespawner reload to apply changes without restarting.
## Compatibility
Compatible with Bukkit, Spigot, and Paper ( Paper is recommended for best performance).
Supports Minecraft versions 1.13 to 1.21+.
Fully configurable to adapt to various server types and world environments.
With Adaptive Range Mob Spawner, you can ensure efficient mob spawning, maintain optimal TPS, and provide a seamless experience for your players.
Armourer’s Workshop Plugin
Create voxel-art to replace or add to the player model, equipment models, CNPCs, and more!
Create decoration blocks for your worlds.
Share your creations on a global library, or a sever specific one.
Direct management of player-equipped skins via commands, or let the player use a GUI.
Support via command/config for making most modded items skinable.
Elevate your server project to a whole new level of detail!
**NOTE: This a plugin version of the [Armourer’s Workshop Mod](https://modrinth.com/mod/armourers-workshop)**
[](https://bstats.org/plugin/bukkit/Armourers%20Workshop%20Plugin/22668)
## How To Use:
For Plugin Server Owner:
1. install any bukkit server
2. install [Cocoon Server Library](https://modrinth.com/plugin/cocoon/versions?l=bukkit)
3. install [Armourer’s Workshop Plugin](https://modrinth.com/plugin/armourers-workshop-plugin/versions)
For Client User of Plugin Server:
1. install fabirc/forge client
2. install [Cocoon Client Library](https://modrinth.com/plugin/cocoon/versions?l=fabric&l=forge) **<-- Important**
3. install [Armourer's Workshop Mod](https://modrinth.com/mod/armourers-workshop/versions)
ArmorTrimEdit
Minecraft version 1.21.x
Plug-In for Paper & Spigot/Bukkit servers
Commands:
– /armortrimedit
– /armortrimedit set [pattern] [material]
– /armortrimedit remove
Permissions:
– armortrimedit.admin (all features)
– armortrimedit.use (apply & remove armor trims)
– armortrimedit.apply (add armor trims only)
– armortrimedit.remove (remove armor trims only)
GUI Usage:
1. Hold a piece of armor in your main hand
2. Run /armortrimedit
3. In the GUI, select a pattern and material
4. Click the lime concrete to apply the armor trim
5. or click the barrier to remove armor trims from the item
Command Usage:
1. Hold a piece of armor in your main hand
2. Run /armortrimedit set [pattern] [material]
3. or run /armortrimedit remove
GUI/Command functions can be enabled/disabled in the config.yml file
All plugin messages can be changed in the config.yml file.
For a survival friendly experience, survival mode can be enabled in the config.yml file which makes the editor consume/return armor trim templates and materials on use.