AsnBlacklist
Plugin for Velocity and BungeeCord proxies that blocks user IPs based on their **A**utonomous**S**ystem**N**umber **(ASN)**.
Protect your server against Layer 7 bot attacks with **ASN**-level filtering.
> **WARNING!** This solution ~~is quick fix~~ does not guarantee complete protection against all bots,
> however, it correctly performs the intended functionality.
## Localization
The localization files are located in the `translations` directory of the plugin and support the [MiniMessage](https://docs.advntr.dev/minimessage/format.html) format.
Localization files are generated automatically on the first plugin startup.
The message shown when a user is blocked by **ASN** can be configured using the `asnblacklist.message.kick` key.
> **Example:**
>
> “`properties
> asnblacklist.message.kick=Your ASN is blacklisted on this server.
> “`
>
[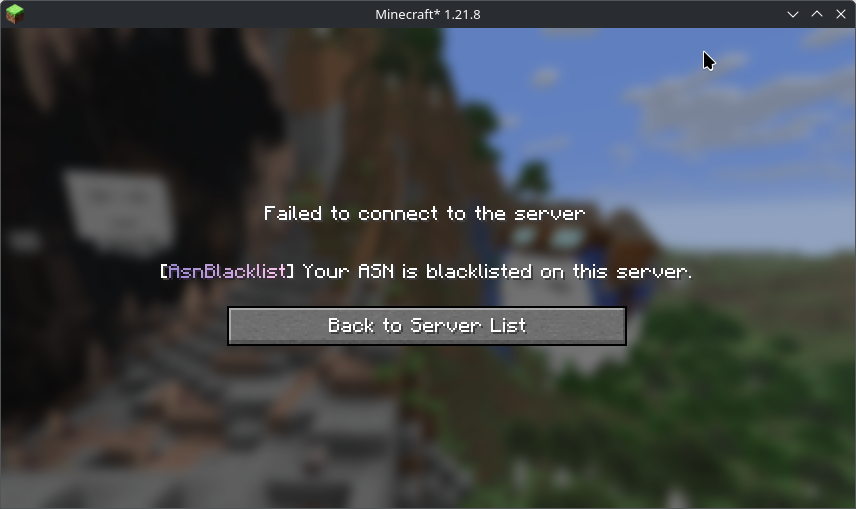](https://raw.githubusercontent.com/novitpw/asn-blacklist/master/images/disconnect_reason_en.png)
If you need to display a message with line breaks, use the `` tag.
> **Example:**
>
> “`properties
> asnblacklist.message.kick=
> Your ASN is blacklisted on this server.
> “`
## Configuration
All duration formats must be specified using the standard **ISO 8601** format, for example:
– `PT6H` → 6 hours
– `P3D` → 3 days
– `P2DT3H4M` → 2 days, 3 hours, 4 minutes
—
> ### asn-blacklist
>
> Blacklisted ASN. You can look up information or obtain the ASN number [on website bgp.tools](https://bgp.tools/)
>
> **Example:**
>
> “`yaml
> asn-blacklist:
> – “AS35048” # Value with the AS prefix
> – “53667” # Value without the AS prefix
> “`
—
> ### maxmind-database
>
> MaxMind database settings.
>
> – `api-key` — MaxMind API key. The default configuration already includes a valid one. If necessary, you can use your own key generated [on the MaxMind website](https://www.maxmind.com/en/accounts/current/license-key).
> – `file` — Path to the local database file
> – `ttl` — Local database retention period (ISO 8601). After the retention period expires, the database will be downloaded again.
>
> **Example:**
>
> “`yaml
> maxmind-database:
> api-key: “apiKey”
> file: “GeoLite2-ASN.mmdb”
> ttl: “P3D”
> “`
—
> ### cache-ttl
>
> Cache duration for verified ASNs (ISO 8601).
>
> **Example:**
>
> “`yaml
> cache-ttl: “PT12H”
> “`
—
## Commands
– `/asnblacklist` – Main command. Aliases – `/asnbl`
– `/asnblacklist add ` – Add ASN to the blacklist.
– `/asnblacklist remove ` – Remove ASN from the blacklist.
– `/asnblacklist list` – Get blacklist of the ASN.
– `/asnblacklist reload` – Reload configuration and localization.
[](https://raw.githubusercontent.com/novitpw/asn-blacklist/master/images/commands_en.png)
## Support and Feedback
Please use the [GitHub issue tracker](https://github.com/novitpw/ans-blacklist/issues) to report bugs and submit suggestions.
## License
The project is licensed under [GNU GPL v3.0 license](https://github.com/novitpw/asn-blacklist/LICENSE).
—
# Описание на русском
Плагин для прокси Velocity и BungeeCord, предназначенный для блокировки IP адресов пользователей по **A**utonomous**S**ystem**N**umber **(ASN)**.
Блокировка по **ASN** позволяет серверам защититься от ботов на уровне L7.
> **ВНИМАНИЕ!** Данное решение ~~является костылём~~ не гарантирует полноценную защиту от всех ботов,
> однако, оно корректно выполняет задуманный функционал.
## Локализация
Локализация находится в директории `translations` плагина, поддерживает формат [MiniMessage](https://docs.advntr.dev/minimessage/format.html).
Файлы локализации создаются автоматически при первом запуске.
Сообщение о блокировке пользователя по **ASN** настраивается с помощью ключа `asnblacklist.message.kick`.
> **Пример:**
>
> “`properties
> asnblacklist.message.kick=Ваш ASN заблокирован на данном сервере.
> “`
>
[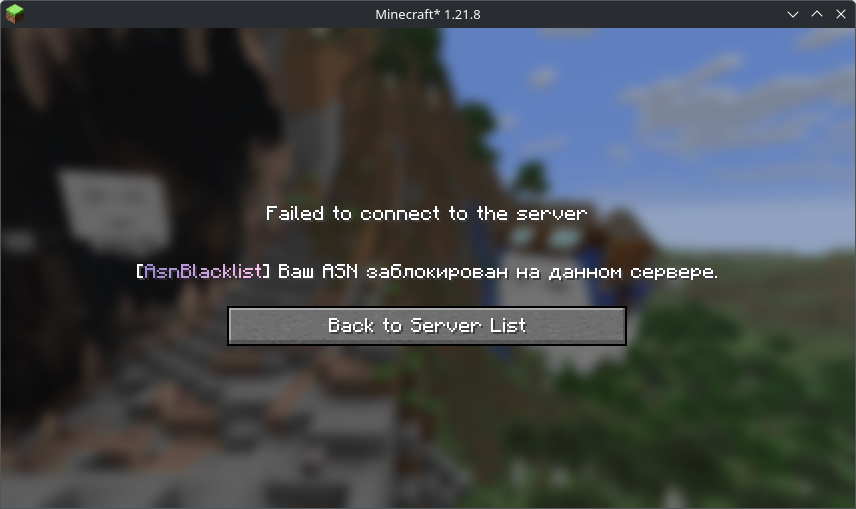](https://raw.githubusercontent.com/novitpw/asn-blacklist/master/images/disconnect_reason.png)
Если необходимо вывести сообщение с переносами строк, то необходимо использовать тег ``.
> **Пример:**
>
> “`properties
> asnblacklist.message.kick=
> Ваш ASN заблокирован на данном сервере.
> “`
## Конфигурация
Все форматы времени указываются в стандарте **ISO 8601**, например:
– `PT6H` → 6 часов
– `P3D` → 3 дня
– `P2DT3H4M` → 2 дня, 3 часа, 4 минуты
—
> ### asn-blacklist
>
> Список заблокированных ASN. Узнать информацию или получить номер ASN можно [на сайте bgp.tools](https://bgp.tools/)
>
> **Пример:**
>
> “`yaml
> asn-blacklist:
> – “AS35048” # Значение с префиксом AS
> – “53667” # Значение без префикса AS
> “`
—
> ### maxmind-database
>
> Настройки базы MaxMind.
>
> – `api-key` — Ключ API MaxMind. Конфигурация по умолчанию уже содержит действующий. При необходимости можно использовать собственный ключ, сгенерированный [на сайте MaxMind](https://www.maxmind.com/en/accounts/current/license-key).
> – `file` — Путь к локальному файлу базы данных.
> – `ttl` — Срок хранения локальной базы данных (в ISO 8601). После истечения срока база данных будет загружена повторно.
>
> **Пример:**
>
> “`yaml
> maxmind-database:
> api-key: “apiKey”
> file: “GeoLite2-ASN.mmdb”
> ttl: “P3D”
> “`
—
> ### cache-ttl
>
> Продолжительность кэша для проверенных ASN (в ISO 8601).
>
> **Пример:**
>
> “`yaml
> cache-ttl: “PT12H”
> “`
—
## Команды
– `/asnblacklist` – Основная команда. Алиасы – `/asnbl`
– `/asnblacklist add ` – Добавить ASN в список заблокированных.
– `/asnblacklist remove ` – Удалить ASN из списка заблокированных.
– `/asnblacklist list` – Получить список ASN, находящихся в блокировке.
– `/asnblacklist reload` – Перезагрузить конфигурацию и локализацию.
[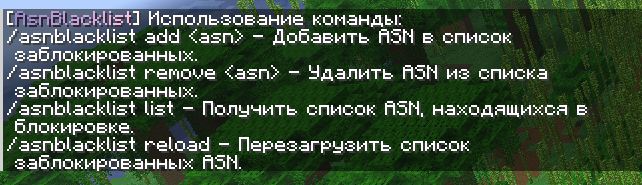](https://raw.githubusercontent.com/novitpw/asn-blacklist/master/images/commands.png)
## Поддержка и обратная связь
Используйте [трекер проблем GitHub](https://github.com/novitpw/asn-blacklist/issues) для сообщений об ошибках и предложений.
## Лицензия
Проект распространяется под [лицензией GNU GPL v3.0](https://github.com/novitpw/asn-blacklist/LICENSE).
AquaWhitelist
# 🌊 AquaWhitelist
A lightweight and modern **Velocity proxy whitelist plugin** built for simplicity and reliability.
—
## ✨ Features
– ✅ Enable or disable the whitelist with a single command
– ✅ Add or remove players dynamically — no restarts required
– ✅ Fully customizable kick message in `config.yml`
– ✅ Automatically saves and persists whitelist entries across restarts
– ✅ Clean MiniMessage-based formatting (supports color & styling)
– ✅ Built for **Velocity 3.4+**
– ⚡ Lightweight & fast — minimal overhead
—
## ⚙️ Commands
| Command | Description | Permission |
|———-|————–|————-|
| `/aw add ` | Adds a player to the whitelist | `aquawhitelist.admin` |
| `/aw remove ` | Removes a player from the whitelist | `aquawhitelist.admin` |
| `/aw enable` | Enables whitelist enforcement | `aquawhitelist.admin` |
| `/aw disable` | Disables the whitelist temporarily | `aquawhitelist.admin` |
—
## 🧩 Configuration (`config.yml`)
“`yaml
settings:
kick-message: “You are not whitelisted on this proxy.”
enabled: true
whitelist:
– Blue_of_Phoenix_
“`
**Explanation:**
– `kick-message` → MiniMessage-formatted message shown to non-whitelisted players
– `enabled` → Toggles whitelist functionality
– `whitelist` → List of allowed player usernames
—
## 🚀 Installation
1. Download the latest version from the **Releases** tab or Modrinth.
2. Drop the JAR into your `plugins/` folder on your Velocity proxy.
3. Restart or reload the proxy.
4. Adjust your `config.yml` as needed.
—
## 🧑💻 Developer
**Author:** [BlackDev / AquaCoding Studios](https://github.com/blackdevcoding)
**GitHub:** [AquaCodingStudios/AquaWhitelist](https://github.com/AquaCodingStudios/AquaWhitelist)
—
## 🪶 License
This project is licensed under the **MIT License** — you are free to modify and redistribute with credit.
AQQBot
# AQQBot
简体中文版
## 介绍
AQQBot是一个基于Onebot v11协议开发的QQ群与服务器互联的插件,可以让用户通过QQ群进行许多操作(例如绑定游戏账号、查询服务器状态)
## 功能
– **账户绑定**: 玩家需要在QQ群中绑定账号后才能进入服务器
– **信息查询**: 玩家可以在QQ群发送特定命令来查询账号的游戏状态(如步行距离),同时也可以查询服务器状态(如服务器tps)
– **群服互联**: 玩家在QQ群发送的消息会被转发到服务器上,玩家在服务器发送的消息也会被转发到QQ群上
## 特点
– **轻量**: 插件本体仅600KB不到
– **高度定制化**: 你可以自由开关插件所内置的各个功能,只需要通过编辑配置文件
– **强大兼容性**: 插件支持基于Spigot/Paper的所有服务端及Velocity
## 安装方式
1. 安装一个基于Onebot v11协议的后端 (如Lagrange.OneBot, LLOneBot)
2. 开启这些后端的正向WS(Websocket)转发功能,记住其中的端口号
3. 安装插件,开启服务器后编辑bot.yml文件:
“`yaml
# 正向Websocket配置
ws:
# 主机地址
host: “localhost”
# 端口
port: 3001
# 启用插件的群号
groups:
– “114514”
“`
– 将此处的 `ws.host` (主机地址) 改为你后端所在服务器的地址(若你的后端和服务器在同一服务器内,不需要进行修改)
– 将此处的 `ws.port` (主机端口号) 改为你刚刚记住的端口号
– 将此处的 `groups` 中的 `114514` 改为你要开启机器人功能的QQ群号
最后,重新启动服务器,若没有出现报错则代表连接成功
## 协议
本插件基于 LGPL-2.1 协议开源,请遵守该协议,最终解释权归 *alazeprt* 所有
## Description
AQQBot is a plugin for interconnecting QQ groups and servers based on the Onebot v11 protocol, which allows users to perform many operations through QQ groups (e.g., binding game accounts, querying server status).
## Function
– **Account Binding**: Players need to bind their accounts in the QQ group before they can enter the server
– **Information query**: Players can send specific commands in the QQ group to query the account’s game status (e.g. walking distance), and also query the server status (e.g. server tps)
– **Chat interconnection**: messages sent by players in the QQ group will be forwarded to the server, and at the same time, messages sent by players in the server will be forwarded to the QQ group as well
## Features
– **Lightweight**: plugin size is only less than 600kb
– **Highly customizable**: you can freely switch on and off the various functions built into the plugin, just by editing the configuration file
– **Strong compatibility**: the plugin supports all servers based on Spigot/Paper and Velocity
## Installation
1. install a backend based on the Onebot v11 protocol (e.g. Lagrange.OneBot, LLOneBot)
2. Enable forward WS (Websocket) forwarding on these backends and memorize the port numbers.
3. Install the plugin, turn on the server and edit the bot.yml file:
“`yaml
# Positive Websocket Configuration
ws:
# host address
host: “localhost”
# port
port: 3001
# Plugin-enabled group number
groups:
– “114514”
“`
– Change `ws.host` (host address) here to the address of the server where your backend is located (if your backend and server are on the same server, you don’t need to change it).
– Change `ws.port` here to the port number you just memorized.
– Change `114514` in `groups` here to the QQ group number you want to enable bots.
Next, Restart the server, if there is no error and warning, the connection is successful.
## License
This plugin is open source based on LGPL-2.1 agreement, please abide by the agreement, the final interpretation right belongs to *alazeprt* all rights reserved.
AntiPopup
**For faster updates, priority support and a discord role purchase AntiPopup Pro on Polymart.**
Click the button below for more details.
[ ](https://polymart.org/resource/antipopup-pro.4921)
**What is this plugin?**
AntiPopup is a plugin aiming to remove chat reporting system entirely using packets. It also has unique feature – blocks the new annoying popup (below) even if your server doesn’t enforce chat reporting (please don’t enforce it).
My plugin is also the safest to use, chance of breaking a different plugin is unlikely, I’d even say impossible. Note that some plugins might break it, report that to me.

**How to install?**
Plug and play, nothing else for you to do.
Optionally you can run **antipopup setup** in console, recommended.
If you use viaversion on bungeecord install AntiPopup ViaVersion addon.
**Commands**
**antipopup setup** – Disables **enforce-secure-profile** in server.properties (console only).
**antipopup reload** – Reloads configuration.
**Faq**
Q: What if my server runs an older version?
A: If you use viaversion and antipopup, 1.19.1+ players will not see popup.
Q: Will it work with ViaFabric?
A: Popup will be shown for 1.19.2 clients spoofing to 1.19, nothing I can fix on my side.
**Support Me!**
Donations are not required but they help me assign more time to improve the software. After donating message me on discord to add you to supporters list.
Available options are:
https://liberapay.com/Kaspian
https://ko-fi.com/kaspiandev
**Supporters**
Analyse.net – Analytics for your minecraft server | 20$
mc.uitwtw.com – Survival RPG & minigames (1.19+) | 10$
**Need Help?**
Message me on [matrix](‘https://matrix.to/#/#future-project:matrix.org’) or [discord](‘https://discord.gg/eak2zA4s6m’).
**Suggestion for players**
For optimal safety I recommend using NoChatReports mod on the client. AntiPopup supports it. If you are looking for a launcher that can handle mods very easily with one-click updates and whatnot PolyMC is a good option.
icon from [flaticon](‘https://www.flaticon.com’)
AntiHealthIndicator
## Overview
The **AntiHealthIndicator** plugin prevents hackers and modders from seeing other players’ health. Designed to be
lightweight with minimal server performance impact, it modifies packets directly, making it impossible to bypass. Logic
executes asynchronously to minimize server load. Additional features include hiding durability, enchantments, item stack
amounts, player saturation, absorption, and XP.
### Requires PacketEvents
Ensure the [PacketEvents](https://modrinth.com/plugin/packetevents) library is installed on your server.
## Table of Contents
– [Overview](#overview)
– [Requires PacketEvents](#requires-packetevents)
– [Supported Platforms & Versions](#supported-platforms–versions)
– [Spoofers](#spoofers)
– [Commands](#commands)
– [Permission Nodes](#permission-nodes)
– [Installation](#installation)
– [Credits](#credits)
– [License](#license)
## Supported Platforms & Versions
| Platform | Supported Versions |
|————————————|——————–|
| Bukkit (Spigot, Paper, Folia etc.) | 1.8.8 – 1.21.11 |
| Velocity | Latest Major |
| BungeeCord (or any forks) | Latest Major |
| Sponge | Latest Major |
## Spoofers
The plugin includes various spoofing features:
– Health (including randomization)
– Air Ticks
– Player Absorption
– Player Saturation
– Player Gamemode
– Player XP
– Item Durability
– Item Enchantments
– Item Stack Amount
## Commands
– `/antihealthindicator` or `/ahi` – Main plugin command.
## Permission Nodes
Operators (OPs) have these permissions by default, except for `AntiHealthIndicator.Bypass`:
– `AntiHealthIndicator.Notify` – Notifies player of updates.
– `AntiHealthIndicator.Bypass` – Prevents receiving spoofed data
– `AntiHealthIndicator.Reload` – Grants access to the `/antihealthindicator reload` command.
– `AntiHealthIndicator.Debug` – Receives debug messages if debugging is enabled.
## Installation
1. **Prerequisites**: Install [PacketEvents](https://modrinth.com/plugin/packetevents).
2. **Download**: Get the latest release from
the [GitHub release page](https://github.com/Bram1903/AntiHealthIndicator/releases/latest).
3. **Installation**: Move the downloaded plugin to your server’s plugins directory.
4. **Configuration**: Customize settings in `config.yml`.
5. **Reload**: Reload the plugin using `/antihealthindicator reload` or restart the server to apply changes.
## Credits
Special thanks to:
– **[@Retrooper](https://github.com/retrooper)**: Author of [PacketEvents](https://github.com/retrooper/packetevents).
– **[@Tofaa](https://github.com/Tofaa2)**: Helped design the project infrastructure and logic. Check out
his [EntityLib](https://github.com/Tofaa2/EntityLib).
– **[@Booky10](https://github.com/booky10)**: Helped with various complex matters.
– **[@Abhigya](https://github.com/AbhigyaKrishna)**: Designed the Gradle Build Chain.
## License
This project is licensed under the [GPL3 License](LICENSE).
AntiCrasher
## Available for Paper, Fabric, Velocity, and Folia
A collection of crash, dupe, and miscellaneous exploit patches bundled into a single plugin/mod.
## Patches
The following exploits are currently patched in this plugin/mod:
– **Bundle Crash Exploit**
– **Book Dupe Exploit**
– **Negative Slot ID Crash Exploit**
– **NBT Tab Completion Crash Exploit**
## Installation
### Paper/Folia/Velocity
1. Download the latest version from [Modrinth](https://modrinth.com/plugin/anticrasher/versions?l=spigot&l=purpur&l=paper&l=bukkit&l=folia) and place it in the `plugins` folder. Restart the server/proxy.
### Fabric
**WARNING** – PacketEvents Fabric is currently broken for online mode servers running 1.20.4 and onwards. There is no workaround for this issue at the moment. If you run a Velocity proxy, you can use the proxy version there instead.
1. Download the latest version from [Modrinth](https://modrinth.com/plugin/anticrasher/versions?l=fabric) and place it in the `mods` folder.
2. Install the latest [Fabric API](https://modrinth.com/mod/fabric-api/versions) for your server.
3. Download the latest `fabric-build` package from [Axionize/packetevents](https://github.com/Axionize/packetevents/actions/workflows/gradle-publish.yml?query=branch%3Afix%2Ffabric-events+is%3Asuccess), and place it in the `mods` folder. Restart your server.
Use the [Official PacketEvents Builds](https://modrinth.com/plugin/packetevents) for 1.21.8+.
## Commands
– /ac reload – Reloads configs. `anticrasher.command.reload`
## Permissions
– `anticrasher.alerts` – Receive alerts when a player attempts to run an exploit.
– `anticrasher.bypass` – Bypass all AntiCrasher checks.
– `anticrasher.updates` – Receive plugin update notifications
anit CHAT
# Chat anit 一个自动屏蔽《Minecraft》中文脏话,和增加IP属地的开源项目。
本插件需要装在Velocity上。前置为SignedVelocity-Proxy需要在velocity和所以1.19.1+的子服上增加
IP属地api为*xiaotuo*提供,脏话屏蔽由*Uapi提供*
使用方法
1.下载本插件,放入velocity的pluging文件夹,启动客户端
>tip
>如果你有子服的Minecraft版本在1.19.1以上需要增加[signed velocity](https://modrinth.com/plugin/signedvelocity/version/1.3.0) 插件到velocity和每个1.19.1+的子服务器。
2.将velocity配置文件“`velocity.toml“` 中“`force-key-authentication“`改为false
3.将所有子服务的配置文件“`server.properties“`中的“`enforce-secure-profile“`改为false
4.启动服务端
**更新日志**: https://github.com/cdpyx/Chatanit/commits/release
English:
# Chat Anit is an open-source project that automatically blocks Chinese profanity in Minecraft and increases IP ownership.
This plugin needs to be installed on Velocity. SignedVelocity Proxy needs to be added on velocity and all 1.19.1+sub servers
The IP locality API is provided by * xiaotuo *, and the profanity blocking is provided by * UAPI*
Usage
1. Download this plugin, place it in the velocity plugin folder, and start the client
> tip
> If you have a sub server version of Minecraft above 1.19.1, you need to add [signed velocity]( https://modrinth.com/plugin/signedvelocity/version/1.3.0 )Plug in to velocity and every 1.19.1+sub server.
2. Change the ‘force key authentication’ in the velocity configuration file ‘velocity. toml’ to false
3. Change the ‘enforce secure profile’ in the ‘server. properties’ configuration file for all sub services to false
4. Start the server
**Update log**: https://github.com/cdpyx/Chatanit/commits/release
angelloNotifier

angelloNotifier
—
A velocity announcement and notification sending and managing plugin.
[](https://visitorbadge.io/status?path=https://github.com/Our-Island/angelloNotifier/)
[](https://github.com/Our-Island/angelloNotifier/)
[](https://github.com/Our-Island/angelloNotifier/actions/workflows/ci.yml)
[](https://hangar.papermc.io/Our-Island/angelloNotifier)
[](https://modrinth.com/plugin/angellonotifier/)
## Introduction
angelloNotifier is a proxy-side notice board for Velocity. It lets you publish one network-wide notice on the proxy,
store it in YAML, and let players reopen that same notice later from a shared history.
The plugin is designed as a public notice board rather than a private mailbox. Notices are global, while each player
only has their own read state. Join-time previews, ignored servers, MiniMessage support, and per-notice lifetime
settings are all built around that model.
## Installation
Build the jar or download a release, place it in the Velocity `plugins/` directory, and start the proxy once. The plugin
will create its working directory and write default resource files on first startup. After that, adjust
`plugins/angelloNotifier/config.yml` to fit your network and either restart the proxy or run `/angello reload`.
If you are updating an existing installation, it is still a good idea to keep a backup of both `config.yml` and
`data.yml` before replacing the jar. The data format is simple and human-readable, but a backup makes rollback much
easier if you are testing new behaviour.
## Quick start
The base command is `/angello`, with `/angellonotifier`, `/anno`, and `/noticeboard` available as aliases. For players,
the usual workflow is very small. `/angello inbox` opens the paged notice list in chat, `/angello show ` reprints a
specific notice, and `/angello unread` reports how many notices are still unread for that player.
For administrators, the central command is:
“`text
/angello send
|| <body> [|| lifetime]<br />
“`</p>
<p>The title is the first segment. The body is the second segment. The optional third segment is the lifetime for that one<br />
notice only. If the lifetime is omitted, the plugin falls back to `settings.default-notification-lifetime` from<br />
`config.yml`.</p>
<p>A simple example looks like this:</p>
<p>“`text<br />
/angello send <gold>Maintenance</gold> || <red>The network will restart in 10 minutes.</red><br />
“`</p>
<p>A notice with a custom lifetime looks like this:</p>
<p>“`text<br />
/angello send <yellow>Reminder</yellow> || Please read the event rules before joining. || 3<br />
“`</p>
<p>If you want multiple body lines, either type actual new lines in the command input or use `n` inside the body segment.<br />
The plugin stores the body as a list of lines and prints it back as a block, with the notice board prefix on its own<br />
first line for multi-line output.</p>
<p>Administrative review commands are `/angello list [page]`, `/angello delete <id>`, and `/angello reload`. Notice IDs do<br />
not change after deletion. If notice `#12` is deleted, that ID remains gone, while later notices continue with higher<br />
IDs.</p>
<p>## Documentation</p>
<p>The GitHub Wiki contains the detailed reference pages for the current implementation. The wiki home page explains the<br />
overall model and intended behaviour. The configuration page documents every setting in `config.yml`. The data page<br />
describes the exact structure of `data.yml`, including player state. The command page explains syntax, aliases,<br />
permissions, and examples in more detail.</p>
<p>You can start here:</p>
<p>[Home](https://github.com/Our-Island/angelloNotifier/wiki)<br />
[config.yml](https://github.com/Our-Island/angelloNotifier/wiki/config.yml)<br />
[data.yml](https://github.com/Our-Island/angelloNotifier/wiki/data.yml)<br />
[Commands](https://github.com/Our-Island/angelloNotifier/wiki/Commands)</p>
<p>## Feedback</p>
<p>Please use GitHub Issues for bug reports and feature requests. When reporting a bug, include your Velocity version, the<br />
angelloNotifier version, your configuration files, and the relevant console logs so the issue can be reproduced.</p>
<p>If the problem involves command parsing or formatting, include the exact command you entered and the exact output you<br />
received. If the problem involves notice state, include the affected part of `data.yml` as well. That usually makes the<br />
difference between a report that can be investigated quickly and one that needs several rounds of follow-up questions.</p>
<p>## Contributing</p>
<p>Contributions are welcome. Fork the repository, create a feature branch, and keep changes focused and easy to review.<br />
When opening a Pull Request, explain what changed, why it changed, and how to test it.</p>
<p>If your changes affect configuration structure, command behaviour, notice persistence, or i18n, please update the<br />
README, the wiki pages, and the shipped resource files where appropriate. Documentation drift is easy to introduce in a<br />
plugin like this because command syntax and stored data shape are part of the public surface of the project.</p>
<p>## License</p>
<p>This project is licensed under the MIT License. See<br />
the [LICENSE](https://github.com/Our-Island/angelloNotifier/blob/master/LICENSE) file for details.</p>
</article>
<article>
<h1>Amplifier</h1>
<div align="center">
<br />
<img decoding="async" alt="Logo" src="https://cdn.modrinth.com/data/cached_images/9597cd0beaedc496aacba7e2eae6b9e532c25df5_0.webp" /></p>
<h3>
<i>Take full control of in-game communication with Amplifier, powered by Simple Voice Chat. This release introduces a powerful suite of tools for moderating and customizing voice chat experiences on your server.</i><br />
</h3>
<h4>Supports 1.20.x–26.1.1</h4>
<div style="display: flex; justify-content: center; align-items: center; gap: 8px; margin-bottom: 0; padding-bottom: 0;">
<a href="https://discord.gg/lodestone"><br />
<img decoding="async" alt="Discord"
src="https://wsrv.nl/?url=https%3A%2F%2Fcdn.jsdelivr.net%2Fnpm%2F%40intergrav%2Fdevins-badges%403%2Fassets%2Fcozy%2Fsocial%2Fdiscord-plural_vector.svg&n=-1" /><br />
</a><br />
<a href="https://lode.gg/plugin/amplifier/versions?l=paper"><br />
<img decoding="async" alt="Paper"
src="https://wsrv.nl/?url=https%3A%2F%2Fcdn.jsdelivr.net%2Fnpm%2F%40intergrav%2Fdevins-badges%403%2Fassets%2Fcozy%2Fsupported%2Fpaper_vector.svg&n=-1" /><br />
</a><br />
<a href="https://lode.gg/plugin/amplifier/versions?l=purpur"><br />
<img decoding="async" alt="Purpur"
src="https://wsrv.nl/?url=https%3A%2F%2Fcdn.jsdelivr.net%2Fnpm%2F%40intergrav%2Fdevins-badges%403%2Fassets%2Fcozy%2Fsupported%2Fpurpur_vector.svg&n=-1" /><br />
</a>
</div>
<div style="display: flex; justify-content: center; align-items: center; gap: 6px">
<h5>bStats:</h5>
<div>
<a href="https://bstats.org/plugin/bukkit/Amplifier/26141"><br />
<img decoding="async" alt="bStats" src="https://img.shields.io/bstats/servers/26141?style=for-the-badge" /><br />
</a>
</div>
</div>
<p></p>
<hr />
<h3>PLUGIN FEATURES</h3>
<p>🔊 Adjust individual player voice volume<br />
🎵 Modify each player’s voice pitch<br />
🗣️ Set personalized voice distances<br />
📢 Enable global voice broadcasting for specific players<br />
🔇 Mute or unmute players independently<br />
🌐 Synchronize player voice settings across multiple servers<br />
🛰️ Broadcast voice packets across multiple servers<br />
🧏♂️ Players can deafen without altering anyone else’s volume<br />
🎧 Selectively hear only certain players<br />
🛠️ Extensive API available for custom integrations</p>
<hr />
<p></p>
<p><img decoding="async" alt="API" width="100"
src="https://cdn.modrinth.com/data/cached_images/22cade4987222cc9758433caa09fac5e16f78834_0.webp" /></p>
<p>Amplifier includes an extensive API that allows developers to integrate Amplifier’s systems directly into their plugins.<br />
Read our <a href="https://docs.lode.gg/#/amplifier/overview">Documentation</a> for usage examples and setup details.</p>
<p><a href="https://docs.lode.gg/#/amplifier/overview"><br />
<img decoding="async"
src="https://wsrv.nl/?url=https%3A%2F%2Fcdn.jsdelivr.net%2Fnpm%2F%40intergrav%2Fdevins-badges%403%2Fassets%2Fcozy%2Fdocumentation%2Fghpages_vector.svg&n=-1" /><br />
</a></p>
<p></p>
<hr />
<p></p>
<p><img decoding="async" alt="Donations" width="300"
src="https://cdn.modrinth.com/data/cached_images/cdb384c9bd255b9ad7368417afc2761217ca2bfc_0.webp" /></p>
<p>Amplifier — like all of Lodestone’s plugins — is completely free to use!<br />
Please consider supporting development through Ko-fi or Paypal. It directly helps fund future projects.</p>
<div style="display: flex; justify-content: center; align-items: center; gap: 8px;">
<a href="https://ko-fi.com/apollo30"><br />
<img decoding="async"
src="https://wsrv.nl/?url=https%3A%2F%2Fcdn.jsdelivr.net%2Fnpm%2F%40intergrav%2Fdevins-badges%403%2Fassets%2Fcozy%2Fdonate%2Fkofi-plural_vector.svg&n=-1" /><br />
</a><br />
<a href="https://paypal.me/johnaqu1no"><br />
<img decoding="async"
src="https://wsrv.nl/?url=https%3A%2F%2Fcdn.jsdelivr.net%2Fnpm%2F%40intergrav%2Fdevins-badges%403%2Fassets%2Fcozy%2Fdonate%2Fpaypal-plural_vector.svg&n=-1" /><br />
</a>
</div>
</div>
<p></p>
<hr />
<p></p>
<p><a href="https://wepwawet.net/p/Lodestone"><br />
<img decoding="async"
src="https://cdn.modrinth.com/data/cached_images/11d2e0c5c57a0b5f1b79662473b151fa672109a6_0.webp" /><br />
</a></p>
</article>
<article>
<h1>AMOTD</h1>
<p># AMOTD – Advanced MOTD Plugin</p>
<p>[中文文档](https://github.com/x1aoren/AMOTD/blob/main/README_ZH.md)</p>
<p>## Introduction</p>
<p>AMOTD (Advanced MOTD) is a feature-rich Minecraft server MOTD customization plugin that supports both traditional color codes and MiniMessage formatting. With AMOTD, you can create server descriptions with gradient colors, rainbow effects, and advanced text formatting, customize player list displays, and set custom server icons.</p>
<p>## Features</p>
<p>– Supports traditional color codes (&a, &b, etc.) and MiniMessage formats<br />
– Gradient and rainbow-colored text support<br />
– Custom player count display<br />
– Custom hover text for player lists<br />
– Random switching between multiple server icons<br />
– Access to preset styles from online style libraries</p>
<p>## Version</p>
<p>– Supported Minecraft Versions: 1.8.x – 1.21.x<br />
– Current Plugin Version: 1.1.0</p>
<p>## Server Compatibility</p>
<p>– Bukkit/Spigot/Paper – Full support, recommend Paper for optimal MiniMessage support<br />
– Folia – Full support with thread-safe implementation, automatically detects and adapts to Folia’s regionalized schedulers<br />
– Velocity – Full feature compatibility</p>
<p>## Commands & Permissions</p>
<p>### Commands:<br />
– `/amotd reload` – Reload configurations and icons<br />
– `/amotd get <StyleCode>` – Fetch preset MOTD styles from online style library</p>
<p>### Permissions:<br />
– `amotd.command.reload` – Permission to use reload command<br />
– `amotd.command.get` – Permission to use get command for style fetching</p>
<p>## Online MOTD Editor</p>
<p>For convenient MOTD creation, we provide an online editing tool:</p>
<p>🔗 [MOTD Online Editor](https://motd.mcobs.cn/)</p>
<p>With this tool you can:<br />
– Preview and edit MOTD effects<br />
– Apply gradient colors and special formats<br />
– Generate style codes for direct server application<br />
– Design professional-level MOTD without memorizing complex syntax</p>
<p>Simply use `/amotd get <StyleCode>` in-game to apply your designed style to the server after creation!</p>
<p>Config<br />
“`txt<br />
# AMOTD Plugin Configuration File</p>
<p># ==============================<br />
# Version Compatibility Notes<br />
# ==============================<br />
# Legacy format: Supported by all Minecraft servers<br />
# MiniMessage format: Requires Paper 1.16.5+ server<br />
# Gradient color support: Requires Paper 1.16.5+ server<br />
# RGB color support: Requires Paper 1.16.5+ server<br />
# ==============================</p>
<p># Language setting (en, zh_cn)<br />
language: “en”</p>
<p># Message format type: legacy or minimessage<br />
# legacy: Uses traditional & color codes<br />
# minimessage: Uses MiniMessage format (requires Paper 1.16.5+ server)<br />
message_format: “legacy”</p>
<p># Legacy format MOTD (using & color codes)<br />
legacy:<br />
line1: “&aWelcome to &bmy &cMinecraft &dserver!”<br />
line2: “&eThis message is generated by &6AMOTD &7plugin &8”</p>
<p># MiniMessage format MOTD (requires Paper 1.16.5+ server)<br />
#<br />
# Recommended online editor: https://motd.mcobs.cn/<br />
# After using, you can generate a style code and apply it with /amotd get </p>
<style code>
#<br />
# Supported tag examples:<br />
# <color:red>Red text</color>
# <gradient:#FF0000:#0000FF>Red-Blue gradient</gradient><br />
# <rainbow>Rainbow text</rainbow><br />
# <bold>Bold</bold>, <italic>Italic</italic>, <underlined>Underlined</underlined><br />
minimessage:<br />
line1: "<gradient:#FF5555:#55FF55>Welcome to my Minecraft server!</gradient>"<br />
line2: "<gradient:#5555FF:#FF55FF>This message is generated by AMOTD plugin</gradient>"</p>
<p># Whether to enable server icon display<br />
enable_server_icon: true</p>
<p># Player count display settings<br />
player_count:<br />
# Whether to enable player count modification<br />
enabled: false<br />
# Maximum player count to display<br />
max_players: 100<br />
# Whether to apply this maximum player limit (true: Actually limit the number of players, false: Only display the modified count)<br />
apply_limit: false</p>
<p># Player list hover text settings<br />
hover_player_list:<br />
# Whether to display player list hover text (when hovering over "xx/xx" player count in server list)<br />
enabled: true<br />
# Text to display when no players are online (only effective on Paper servers)<br />
empty_message: "No players online at the moment" </p>
<p># Whether to enable debug mode<br />
debug: false<br />
```</p>
</article>
</main>
<script type="speculationrules">
{"prefetch":[{"source":"document","where":{"and":[{"href_matches":"/*"},{"not":{"href_matches":["/wp-*.php","/wp-admin/*","/wp-content/uploads/*","/wp-content/*","/wp-content/plugins/*","/wp-content/themes/minecraft/*","/*\\?(.+)"]}},{"not":{"selector_matches":"a[rel~=\"nofollow\"]"}},{"not":{"selector_matches":".no-prefetch, .no-prefetch a"}}]},"eagerness":"conservative"}]}
</script>
<script id="wp-emoji-settings" type="application/json">
{"baseUrl":"https://s.w.org/images/core/emoji/17.0.2/72x72/","ext":".png","svgUrl":"https://s.w.org/images/core/emoji/17.0.2/svg/","svgExt":".svg","source":{"concatemoji":"https://minecraft-files.ru/wp-includes/js/wp-emoji-release.min.js?ver=7.0"}}
</script>
<script type="module">
/*! This file is auto-generated */
const a=JSON.parse(document.getElementById("wp-emoji-settings").textContent),o=(window._wpemojiSettings=a,"wpEmojiSettingsSupports"),s=["flag","emoji"];function i(e){try{var t={supportTests:e,timestamp:(new Date).valueOf()};sessionStorage.setItem(o,JSON.stringify(t))}catch(e){}}function c(e,t,n){e.clearRect(0,0,e.canvas.width,e.canvas.height),e.fillText(t,0,0);t=new Uint32Array(e.getImageData(0,0,e.canvas.width,e.canvas.height).data);e.clearRect(0,0,e.canvas.width,e.canvas.height),e.fillText(n,0,0);const a=new Uint32Array(e.getImageData(0,0,e.canvas.width,e.canvas.height).data);return t.every((e,t)=>e===a[t])}function p(e,t){e.clearRect(0,0,e.canvas.width,e.canvas.height),e.fillText(t,0,0);var n=e.getImageData(16,16,1,1);for(let e=0;e<n.data.length;e++)if(0!==n.data[e])return!1;return!0}function u(e,t,n,a){switch(t){case"flag":return n(e,"\ud83c\udff3\ufe0f\u200d\u26a7\ufe0f","\ud83c\udff3\ufe0f\u200b\u26a7\ufe0f")?!1:!n(e,"\ud83c\udde8\ud83c\uddf6","\ud83c\udde8\u200b\ud83c\uddf6")&&!n(e,"\ud83c\udff4\udb40\udc67\udb40\udc62\udb40\udc65\udb40\udc6e\udb40\udc67\udb40\udc7f","\ud83c\udff4\u200b\udb40\udc67\u200b\udb40\udc62\u200b\udb40\udc65\u200b\udb40\udc6e\u200b\udb40\udc67\u200b\udb40\udc7f");case"emoji":return!a(e,"\ud83e\u1fac8")}return!1}function f(e,t,n,a){let r;const o=(r="undefined"!=typeof WorkerGlobalScope&&self instanceof WorkerGlobalScope?new OffscreenCanvas(300,150):document.createElement("canvas")).getContext("2d",{willReadFrequently:!0}),s=(o.textBaseline="top",o.font="600 32px Arial",{});return e.forEach(e=>{s[e]=t(o,e,n,a)}),s}function r(e){var t=document.createElement("script");t.src=e,t.defer=!0,document.head.appendChild(t)}a.supports={everything:!0,everythingExceptFlag:!0},new Promise(t=>{let n=function(){try{var e=JSON.parse(sessionStorage.getItem(o));if("object"==typeof e&&"number"==typeof e.timestamp&&(new Date).valueOf()<e.timestamp+604800&&"object"==typeof e.supportTests)return e.supportTests}catch(e){}return null}();if(!n){if("undefined"!=typeof Worker&&"undefined"!=typeof OffscreenCanvas&&"undefined"!=typeof URL&&URL.createObjectURL&&"undefined"!=typeof Blob)try{var e="postMessage("+f.toString()+"("+[JSON.stringify(s),u.toString(),c.toString(),p.toString()].join(",")+"));",a=new Blob([e],{type:"text/javascript"});const r=new Worker(URL.createObjectURL(a),{name:"wpTestEmojiSupports"});return void(r.onmessage=e=>{i(n=e.data),r.terminate(),t(n)})}catch(e){}i(n=f(s,u,c,p))}t(n)}).then(e=>{for(const n in e)a.supports[n]=e[n],a.supports.everything=a.supports.everything&&a.supports[n],"flag"!==n&&(a.supports.everythingExceptFlag=a.supports.everythingExceptFlag&&a.supports[n]);var t;a.supports.everythingExceptFlag=a.supports.everythingExceptFlag&&!a.supports.flag,a.supports.everything||((t=a.source||{}).concatemoji?r(t.concatemoji):t.wpemoji&&t.twemoji&&(r(t.twemoji),r(t.wpemoji)))});
//# sourceURL=https://minecraft-files.ru/wp-includes/js/wp-emoji-loader.min.js
</script>
</body>
</html>
<!--
Performance optimized by Redis Object Cache. Learn more: https://wprediscache.com
Retrieved 754 objects (148 KB) from Redis using Predis (v2.4.0).
-->