
0.1
release
Minecraft Statistics
Player Statistics is a Minecraft server plugin that tracks and syncs player statistics to MySQL database also providing useful commands and features for both players and server administrators.
Minecraft Statistics
🎮 Player Statistics Minecraft Plugin
Player Statistics is a Minecraft server plugin that tracks and manages player statistics, providing useful commands and features for both players and server administrators.
---
✨ Features
- 💾 Integrates with MySQL for persistent data storage - ⚡ Provides commands to view and sync player stats - 📊 Tracks player statistics automatically - 🔧 Easy to configure and extend
---
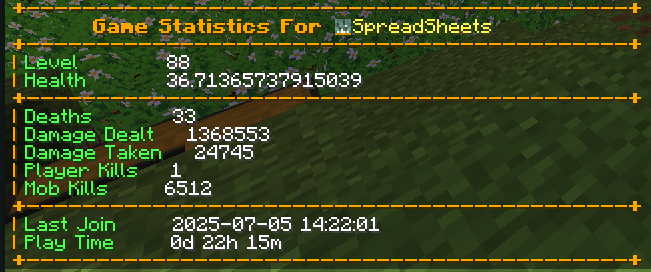
📷 Screenshots
---
🚀 Getting Started
1. Installation
1. Download the latest compiled `.jar` file from the Releases section. 2. Place the `.jar` file into your server's `plugins` directory. 3. Restart your Minecraft server.
2. Configuration
1. After the first run, a `config.yml` file will be generated in the plugin's folder. 2. Open `config.yml` and update the MySQL database settings and other options as needed:
```yaml mysql: host: localhost port: 3306 database: minecraft username: root password: yourpassword ```
3. Save the file and restart the server to apply changes.
---
🕹️ Commands
| Command | Description | Permission | |-----------------|------------------------------------|-----------------------------| | `/stats` | View your statistics | `playerstatistics.stats` | | `/syncplayers` | Sync all player data with database | `playerstatistics.sync` | | `/debugger` | Debug plugin operations (admin) | `playerstatistics.debug` |
---
🛠️ Building from Source
> Note: Most users do not need to build from source. Download the pre-built `.jar` from the releases if you just want to use the plugin.
1. Make sure you have Java 17+ and Maven installed. 2. Clone this repository:
```sh git clone https://github.com/yourusername/PlayerStatistics.git cd PlayerStatistics ```
3. Build the plugin:
```sh mvn clean compile mvn clean package ```
4. The compiled `.jar` will be in the `target/` directory.
---
🤝 Contributing
Contributions are welcome! To contribute:
1. Fork this repository and create your feature branch (`git checkout -b feature/AmazingFeature`) 2. Commit your changes (`git commit -m 'Add some AmazingFeature'`) 3. Push to the branch (`git push origin feature/AmazingFeature`) 4. Open a Pull Request
Please follow the existing code style and include clear commit messages.
---
💬 Support
For issues or feature requests, please open an issue on GitHub.